After effects: Motion loop
- Jodie Hirst
- Oct 7, 2015
- 9 min read
Motion Loop
The first session of after effects in term 1 was on how to create a motion loop, this is a piece of information for example type or an object that starts and ends in the same position, the reason for motion loops is to avoid living holds this is when a piece of typography needs to stay on a screen for long enough for the reader to acknowledge it, but stood still it just looks like the animation has paused. therefore you move the type slightly making it look like a wobble motion, adding moving background will also create this effect. this is also to ensure the viewer the animation is still running and the movie has not stopped running.
to get us to understand this idea we were shown part of a short movie, 'the Thomas Beale cipher'. this is a short film by Andrew s Allen. the video was created using Tv production techniques, such as motion loops using only a limited amount of textures and animations on loops. the film looked familiar to me as i new i had been show it previously but not for a very long time. i was first confused by the style and wounded how we were going to achieve it. it actually looked quite complicated it gave off a simple effect. i thought it looked old styled but also sophisticated in the way in which it was produced. the style of the constant moving of motion loops fit with the idea of them being on a moving train. so we were td after watching this clip that we were creating a scene that cold be placed into a longer movie. the first thing we were asked to do was to have a character ready for when we wanted to start. i had previously drawn a man in a suit, but after seeing he example i misjudged what it was that we needed. i found that i needed a more complex and artistic drawing. the reason for this is because although i am specialising in print graphic design we are taught these methods to enhance our skills and give us more variety and i this case i need to take my speciality and use it to my strengths so i decided that after i had found out what we were doing and how to do it i would go away and do a more intricate design and create another motion loop, for now i was planning to experiment with the tools and skills we were going to be learning. here is my character ...


so we started by opening the character and making sure the canvas size was 100pxX1920px, to ensure that it would fit onto the stage of after effects when imported. we also learned early on that the different parts of the character being on different layers was vital because of the type of animation we were doing, the parts were t move slightly different ways an not all together as one. we opened up after effects and imported the illustrator file onto the aftereffects library then enabling us to drag the layers down to the timeline. this time last year i had no idea how to use after effects and although through the year i still didn't think i did i learned today that actually i know ore than i thought, i know how it works and how to rectify certain things however i'm still not an expert o it and i plan to document my work well and how i did it o i can reference it in future work.
importing the image was straight forward the only thing that would need changing on the setting was to ensure the footage type is set to composition- retain layer size. we actually learnt the reason last year. i new that it would ensure all the layers and positioning of the objects would stay the same and appear as they did in illustrator on the stage in after effects which is ver important if you don't want it to be tie consuming having to place all the elements back in the right place., when a simple click of a button would do it for you.
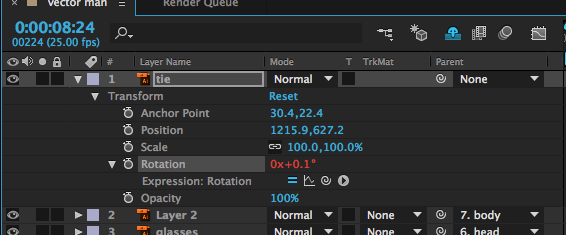
the next thing we needed to to was to change the anchor point on the different parts of the character. t first i was confused on wha exactly i needed to do but i learnt when later trying to more the hair that to move the characters parts in a way thats realistic like the tilt of a head the anchor point in which the animation is rotated around controls this. so initially i placed the anchor points whee i thought they would work best, some may have needed a little but of moving but this was easy rectified. to do this al i had to do was click on a layer that i wanted to use and click the (pan behind) button in the top tool bar, and this allowed me to move the points.
someone in the group pointed out that the image sometimes and n some placed looked slightly bury, we were told how to rectify this and get the best image quality we could from after effects. the toggles/modes and switches button was pressed and again we have been introduce to this before and it helped us do a lot of things. we were told that if we waned to maximise our quality, heck hat all layers have the forward slash showing next to them.


as we found some peoples images would not ave looked realistic if the hair moved without the head, spacing would become available between the two thats un natural, for some it wasn't just the head and the hair in my case it was as well as the glasses to the head. initially i went back into illustrator and grouped the head and hair as the same layer importing it back into after effects as one layer but i was then told that actually a better way of doing this. we were told to keep everything separate and that the head and hair could be grouped in after effects and this was better than the illustrator was because although they had been grouped they could be un grouped if we decided we wanted just 1 of the 2 grouped elements to move. i the remember that last year we used the parent tools to group the layers, by simply dragging them onto each other.
the problem i had was that without grouping when i moved the head to the side too much the hair was then floating and looked like a wig and same with the head being moved , this is why i grouped them.
i found the mistake i made was not naming the layers in illustrator a to what they had on that layer for example, head, hair etc. but this was easily solved by changing them on after effects. i did this because it allowed me to group and parent certain elements together and at the side of the parent icon it told me where i had linked it to, without this knowing where everything was going would have been a struggle. initially i grouped the head and hair and then the collar to the body and i left everything else. although i discovered later on that when i animated the head the glasses stayed the same making the animation look unrealistic so i went back and grouped the glasses with the head. we then began t start adding the animation, we were told that the animation was to have a slight movement a constant loop, the animation i didn't have to move massively as this would i've the wrong effect to the solution of living hold.


it was now time to add the animation, to do this we again used the rotation and positioning arrows below the layers to animate the character. i had used these before and i had a rough idea of how they wold work. again i added key frames using the stop watch but this tie we made a key frame at the beginning of the time line and then at the end before filling in the middle, this was to ensure that the motion definitely stopped where it began after all that was the aim of motion loop. i then added the keyframes in the middle making the head tilt slightly but not too much as this then gave the head a distorted look because of the white space from the neck. pressing play then gave me the simple moving effect that i wanted to achieve. at the beginning of the session Sarah told us that we were going to learn 3 ways of creating this effect, to suit all people as different ways of thinking will prefer different methods. this was the one that most suited me. this was the one that worked for people who work better visually and like to be able to see what they are creating step by step having full control of how it looks. i enjoyed playing around with the key frames and positions and i was actually exited t see how this method could be done in man other ways....
the next way to create this effect was using a pre set in after effects called wiggler, it creates a path of key frames for you so you don't have to input them manually it advantage is that its quick however i am someone who would rather control the movement and know where i was positioning everything on on this pre set the points are not able to be moved they would have to be deleted and re applied but this again only gives you a different pattern not fl control i found this out when i tried it. it was simple all we had to do was create the first key frame have the layer selected and with he wiggler panel that if not already Shown it can be found in the windows panel, the frequency and magnitude is played around with to get the effect you want. the frequency i how any key frames there is and how often they appear, the magnitude is how wide spread the motion gets and how exaggerated it can become the bigger the path. i can honestly say i still don understand how to use these two tool effetely the first time it takes some experimenting with as I'm not familiar with it i don't now how big of a difference a few number make, but i know when i do another one as my final rather than using the character i don't like, i will be able to wrap my head around it and understand the way it works a bit more.


the final way of creating a motion loop is by using code, this appeals to people who like the coding side of design and prefer to think scientifically and mathematically and eve musically because the way its used on the timeline is similar to that of a musician on a scale. the advantages of this is that the method is consistent and also that unlike the pre set method the key frames and positioning can actually be changed and modified depending on what you want. the disadvantage though is that if like me coding and mathematics isn't something you easily get your head around or find interesting it can be hard, long and trying.
again this method we were shown actually seems pretty simple but i cold imagine that trying to do the things without now what the code would be very challenging as a pose to clicking the button and doing it manually and visually. to get the expressions section up which is what the codes run on, all you do is click the stopwatch but hold down alt at the same time bringing the section up as shown above. this then again is treated the same as before however no key frames are involved, just click on the layer you want and type in the code in the section to the side. again seems easy but knowing the code would be harder than experimenting with key frames in my opinion.
that is the three ways to do motion loops, i myself am shocked there are so many ways to do the same method because of the practice i previously had in after effects using key frames only i was fascinated to find there were varying other ways to get the same effect. however i do feel that sticking to experimental key frames is my best option to keep to my strong points. the next thing to do was to add textures into the background, this is what makes the animation have depth and a theme even. from the beginning i wasn't happy with the character so i didn't think that the textures gave it any particular theme and because i planned to start again i experimented as much as i could. i turned the tie to a marble colour and also gave it a wooden background. this process was easy by simply importing textures and then dragging them to the place that you wanted, for example i dragged a texture under the tie and changed the trakmat to alpha matte, this then transformed the tie into the texture.

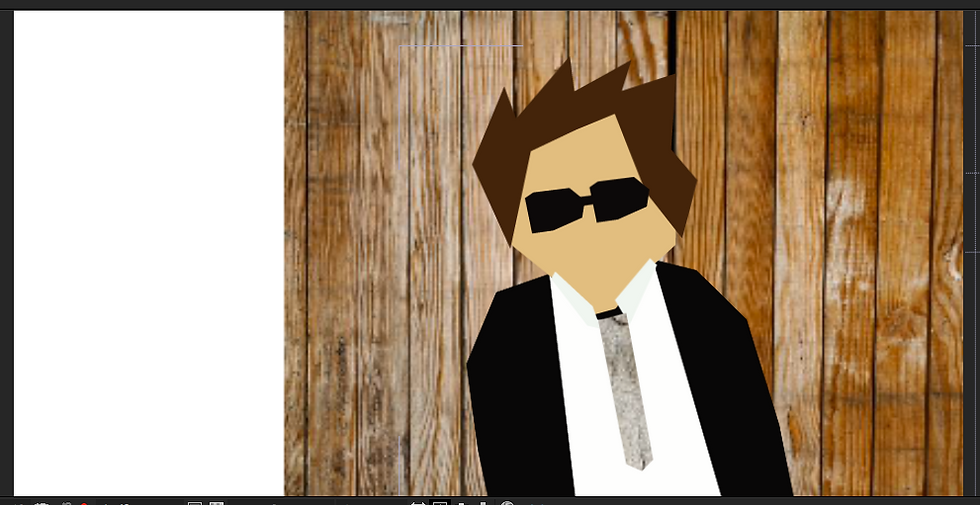
here is my final outcome of the session...
overall i think the technique of motion loop can be worked with really well. especially with a theme, for example the demo version had a vintage theme starting with the textures and the character itself being an older man in a top hat. because of this i knew i wanted to have another attempt with all the techniques i had learnt from last year and todays session. i wanted one with a theme and a better character. so i got to work...


Comments