Cinema 4D: Bottle
- Jodie Hirst
- Apr 15, 2016
- 5 min read
We then moved on to creating a Bottle shape, this was a little more complex but can still be done in a simplified and easy way, we opened up an illustrator file with the same format as the can, a layer for the bottle and a layer for the liquid inside, we changed the points to centre 0, however this time we made the x axis meet the Y axis at the bottom. We opened cinema 4D and merged the illustrator file in. Again we added lathes to the 2 layers following the same steps as before. Below are some screen shots that will show the stages.


We were told there were 4 versions of cinema 4D, studio, prime, broadcast and visualise. We were using studio, however we had to change the setting to broadcast because that was aimed more at motion graphic designers and they are the tools we needed for this. I wasn't aware that cinema 4D had different varieties.
Because we needed a glass material we were able to forget this from a preset that the broadcast version of cinema 4D has, we clicked this and it gave us a preset material, the only thing we had to change was to un tick bump, the material had a slight bumpy texture and we wanted to get rid of that to get the smooth finish we were hoping for. In the image below the bottle is not yet visible because of the dark background but you also can’t see the brown colour of the liquid inside the bottle yet because of the background also. The initial pattern that the glass was making on mine was different to everyone else's, I thought this was a problem however it seemed that this was ok, once the background was added it would look the same as everyone else's.


We added a white floor and background and created a compositing tag, this was to ensure the background again was flat, initially I hadn’t pressed the button I should have done so I had a grey background that the default render view gives. However what I learnt form that was that if ever I have that situation I know exactly what to go to. I’ve learnt the in using cinema 4D after one mistake happens and you know how to fix it you start to learn about many more ways to fix things and it becomes an easier piece of software to use. I have already learnt so much about the software after using it 3 times in workshops and some extra times to help with my studio work.
I then realised that this technique could really help when doing my feel good drinks campaign to mock up my bottles, so I took note of how to make the bottle transparent by making the bottle colour whit and changing the preset to glass. I could then change the colour of my liquid depending on the flavour I choose.

So far the steps to create the bottle seemed straight forward and similar to the can but adding the label is where it got different. Instead of a simple wrap around label we planned to do stamp labels so we left a gap in the bottles. To do this we added a cylinder and fitted it tightly around the bottle, removing caps so it became a tube, we added a new material and ticked the alpha command. This meant that when i added a material, anything that was black was shown and anything white would be transparent, so we added the label mask, which was a simple black square and circle. When invert was the ticked the labels sat in the right position on the bottles.
Although the labels were sat in the right place, thin white lines were visible, this was a problem that occurred in a lot of instances in cinema 4D, but it seemed that although e used a PGN, which allows no rigid edges, cinema 4D still had this defect.
To resolve this, we turned the projection on the material to cylindrical, however this then created a tile effect of the label but by un ticking tile this removed it. the next problem was the label then didn't fit to the size of he cylinder so we fitted the material to the object by right clicking and selecting.


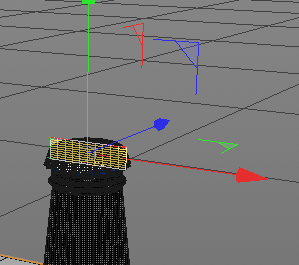
The next thing to do was the lid, I was unsure on how we were going to do this because I assumed it would be done by creating an outline in illustrator and lathing it like we did the bottle. We were going to create it by making a loft object, a series of objects piled on top of each other to create a shape. We made a star and 5 circles; they appeared on screen in the wrong axis so we changed it so they faced upwards. I changed the radius of the circles each time getting smaller and smaller until the top one was 0.
We added a loft object through the subdivision menu and dragged all shapes into it; we could then drag the shapes up using the Y-axis to create a bottle top shape. This was easier to do in a side view, we then ticked a command called organic form and this created ridges in the star shape creating a more realistic bottle top, because before the shape was still flat when rendered and didn’t look realistic. After making the lid thicker it was starting to look like a real bottle top, material just needed to be added. Below shows the stages of progress.


We started a new material for the cap and again went through the settings, removing default specular, adding reflectance legacy and changing Fresnel settings. We then added the pre made file through texture and added the material to the cloth surface. The image on the bottle top was not placed correctly, the material is square and was being wrapped around a circle object, so the mapping had to be changed to we were looking down on the material, by changing the projection to flat and fitting it to the object it made the material work but the text was the wrong way around. We had to use the point selection to rotate the lid material 180 degrees, after fitting to object again the bottle finally looked how it should. Below shows the stages described.


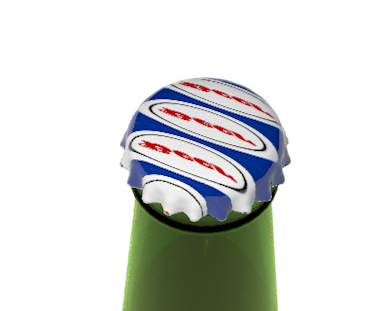


We changed the background colour to a complementing bright colour to give a good shot of the bottle, using the same render settings as before. Personally I am happy with my outcome, I think this is a technique we should have being shown before now especially with the studio brief of YCN where I responded to feel good drinks. This would have being really useful at the time and I want to go back and have a lot at what I can produce in this style for it. I’m beginning to enjoy using cinema 4D, I like how the result you get are realistic and although they look a little more cartoon than they should it placed objects in a real 3D space. I have found using cinema 4D challenging at first but I now know the basis and am able to navigate around to do the simple things. I have also found that I am able to fix things when they go wrong and that was never something I was good at when using software that was unfamiliar.


Comments