After Effects: 3D Cameras & Page turn effects
- Jodie Hirst
- Jan 20, 2016
- 5 min read
Coming back after some weeks off we are starting a new project, one that a little more technical than the ones we have done previously. Our project for today was based on using 3D tools in after effects, its a technique that has a particular style and approach because although it looks 3D, its flat 2D objects that exist in a £d space. The technique has become a good style to use in motion graphics because you can keep all quality of illustration and put it in a 3D space, this becomes desirable.
The video we used as reference was 'All I ever wanted was everything' by MGMT featured on Vimeo, our aim is to have the camera pull back on an image just like this clip. The camera starts close up and pulls back giving the potential of storytelling, revealing objects and charecters.an effect that really works well on this clip is the roll on effect, one we will be incorporating into our finished products. The first step was to set up the 3D space and then start the work visually, working with textures colours and effects.
Before the lesson we were asked to create a scene that consisted of between 6-8 layers, one colour on each layer and they had to be organised with the foreground layers at the top and the background images at the bottom. We were told to expand out layers out f the art board so we could pan the camera out and the ends of the images would not be exposed. Here is my illustration...

Before going into after effects we stretched the art board just bigger than our art work and then saved it as a bigger version, this was to have a HD version that would be clear in after effects. We then went into after effects imported the images, with them all staying the same size and in the same place by using the 'composition- retain all layer sizes' option. We have used this in a number of projects now that makes it really easy to import, something I have learnt and will use a lot in the future.

To set up the 3D aspect we went onto toggles switches and modes and turned on the 3D box, this made the space 3D on all objects and layers. This made 3 arrows appear on objects the x, y and z-axis allowing us to move it in a 3D manner. It’s also recommended that we use the output view of '2 views- horizontal'. This brings out 2 screens and enables you to see two angles and work better.


Making the one side an active camera and one side a top view will help when animating and arranging the project, to set up the object we started to move them layer by layer starting with the background, placing layers behind each other with gaps, to leave room for the camera to pan out. Originally I found this hard to understand, I didn’t get the way we were looking at the after effects file, one I did I was able to re position and edit easily. The problems that the majority of us had was that when moving the objects they became out of sync with each other but we were able to pull them back into proportion.

It wasn’t until we added a camera view that I then understood the top angles and the way we were working, we did this by clicking layer, new and camera, changing the settings as shown on the screen shot.
As shown below the camera show on top where its positioned, and its range with point of interest, this was when I started to get the hang of what we were doing, i was able to zoom into a piece of sky and then the animation zoomed out at the right speed to reveal the image, originally it had gaps but I was able to fix them. I also saw how I could use the left and right cameras to edit the animation. I was able to use the left angle to make the camera pan over the trees instead of through them, which gave a really good simple but effective look.

I didn’t know why, but my assets had being pixelated making my animation look bad, I was told we could fix it later and we did by using toggles, switches and modes and making sure the diagonal line was clicked, this was meant to fix the problem because I was working with vector shapes, because it didn’t I clicked the clog next to it on each layer, this rasterized the layers and it worked well making the edges slick and sharp, just like my original art work.
Textures were making the example video have a good effect so we decided to add some, whoever we did it by pre composing into a different composition but they were linked, so any changes made on the separate one were made on the main composition, or I could use the track mat alpha we used in the first project of this year.
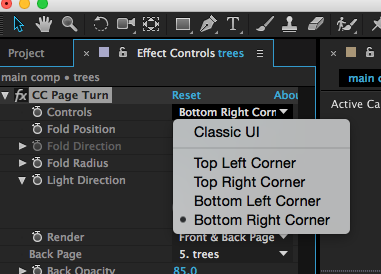
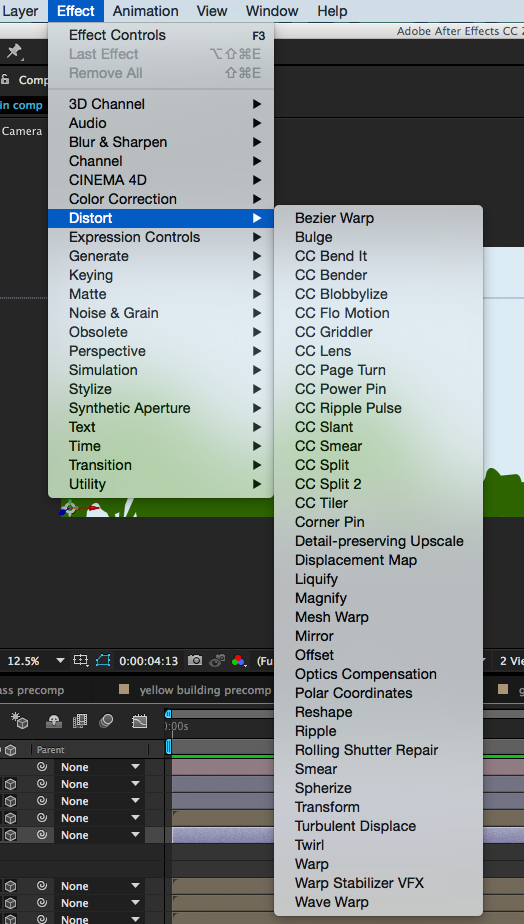
I didn’t want to overcrowd my animation so I only put textures on certain layers and it made them look good, the textures were subtle and complemented each other, to change this visually further we looked at the roll on effect, selecting the layer we clicked effect, distort and CC Page turn, changing the setting to classic and effect direction 0 to -180, this will make the I made roll horizontally, by clicking on the stopwatch to activate key frames with the object layer selected and key frames selected you could use the target in the middle to move the object how you wanted.
Originally I had troubles with this because I hadn’t realised I had to release the diagonal line on the toggles modes and switches so that it stayed in the right place.
Here is my finished project....
I really like this effect now after trying it, when I saw the clip at the beginning I was worried it was going to be very difficult, and although hard to get my head around I know understand the idea of it and I want to incorporate it into my studio work somehow, now I know how to do it I can make art work that works well with textures and effects to come up with a really sophisticated outcome. I can even add music to give a more dramatic effect. Overall, although complicated at the beginning I am very happy with my first out come and hope to have more in the future.


Comments